Contents
The most annoying and consistently ignored prompt when using SSH is that stupid “The authenticity of host blah, blah, blah can’t be established” and then a fingerprint that no one ever has or ever will bother to authenticate. Be honest, you’ve skipped this message more times than you can count and just answer ‘yes’ so you can get on with life, right? Maybe it’s time we changed that.
If you think about it, this is actually an extremely important prompt saying “hey, before you connect, don’t you think you should make sure that other system is actually who they say they are?” Checking fingerprints is time consuming and sometimes truly difficult if, say, the remote server is physically far way and in a different time zone where all the I.T. people are asleep when you need to work. Fortunately, there’s an elegant and robust solution – SSHFP.
What is SSHFP?
Really simply, Secure Shell key FingerPrints (SSHFP) is a type of DNS entry that lists a server’s SSH fingerprint(s). Think about that, because it’s really cool. You can do a DNS lookup and find out what a server’s fingerprint should be, then you can check that against what SSH reports in that annoying message. This makes comparison pretty easy, so maybe we can stop ignoring that prompt! Actually, if we automated this then we could avoid that prompt altogether, right? And, if the DNS zone was signed using DNSSEC, then we could trust those fingerprints have not been tampered with… Told you this was cool.
Setting up SSHFP
As I alluded to in the last section, you really do need to have your DNS zone secured via DNSSEC otherwise there’s no way to trust your published SSH fingerprints. Fortunately, most DNS providers offer that as an easy one-click option. Once you have that sorted out and propagated, we can get SSHFP set up.
The first step is getting your SSH fingerprints in the right format. You can opt to do it the manual way or I’ve put together a script to do the typing for you.
Scripted record generation (easy)
First off, you’ll need to download the script. Save that somewhere you can access it easily like your home directory. Go ahead and run it and it’ll generate your SSHFP records for you. Note that if the script does not detect your hostname automatically or if you want to generate records for a different server/hostname, then you’ll have to use the -h switch. If your SSH server is running on a non-standard port, then you’ll have to use the -p switch. A few examples:
# allow script to detect local machine hostname on default port 22
/bin/sh sshfp.sh

# autodetect local machine hostname, query custom SSH port 222
/bin/sh sshfp.sh -p 222

# specify hostname but query standard SSH port 22
/bin/sh sshfp.sh -h server.mydomain.net

# specify hostname and query a custom SSH port 4000
/bin/sh sshfp.sh -h server.mydomain.net -p 4000

# access built-in script help
/bin/sh sshfp.sh --help
I’ve run the script against one of my servers to give you an example of what the output is like. Check out the screenshot.

You can see that four entries, in two groups, have been generated. Let’s pay attention to the numbers that come after IN SSHFP, starting with the ‘1 1’. To understand what they mean, just look at the reference table that’s printed below. The first 1 means it’s an RSA key. The second 1 means it’s the SHA-1 hash of the server’s host key. Similarly, the second entry shows ‘1 2’. Again, using the table, we can see this is an RSA key with a SHA-2 hash. Looking at the second group, and referencing the table again, we can see that the 4 1 and 4 2 mean ED25519 key with SHA-1 and SHA-2 hashes, respectively.
Now, pay attention to that note I’ve included for you: We want to use either RSA or ED25519 algorithms with SHA-2 hashes only. So, I would only want to use the second DNS entry generated in each group. Easy, right?
Depending on your setup, you’ll obviously get different output. The important take-away here is that note at the end. Also remember you can list multiple SSHFP entries in DNS. I often put both my RSA and ED25519 key SHA-2 hashes so that older clients can reference the RSA and newer clients can reference the ED25519. Just to make it very clear, my DNS SSHFP entries for svc.asifbacchus.app would (and do!) look like this:
svc.asifbacchus.app IN SSHFP 1 2 f05a25d7416d19a112717be4b1c2a559741ef0aab6d1269edcd734a546dead9b
svc.asifbacchus.app IN SSHFP 4 2 3b00cc3606a6f6e39b45f7783376be07041632fa9105932c0f6a49428176d61f
Hopefully this script saves you a little time. Remember, everything it outputs is totally public and you can use this script against any SSH server for which you want to get SSHFP entries. If you have any problems with the script, shoot me a message in the comments.
Manual record generation
First of all, switch to your home directory or somewhere we can make some temporary files. Now, we need to get the public host key being sent by the SSH server for which we want to generate fingerprints. We’ll do this using the ssh-keyscan program. In this example, I’ll use one of my servers so we can get some real results and you can follow along. Note that I run my SSH servers on a non-standard port so I have to use the -p parameter. If you run on the standard port 22, then you can omit that parameter. Finally, even if you’re querying the local machine, it’s still worth doing this step since you want to be sure you’ll be generating the SSHFP record for what a remote machine would see, so use your FQDN for the server name and not something like ‘localhost’. If you’re not sure you are doing things right, just query the same server I am in my example and compare your results.
# switch to my home directory
cd
# run ssh-keyscan against target server, get RSA host key
ssh-keyscan -t rsa -p 222 svc.asifbacchus.app > sshfp-rsa
# run ssh-keyscan against target server, get ED25519 host key
ssh-keyscan -t ed25519 -p 222 svc.asifbacchus.app > sshfp-ed21159
Assuming you queried my server, you’d see this in the sshfp-rsa file:
[svc.asifbacchus.app]:222 ssh-rsa AAAAB3NzaC1yc2EAAAADAQABAAACAQDJA3k45QIajS/iaRbOoOzeSdiGmnDC6/PVlqHnj0ut9hGFq92Qw4eN7zvQDRAfst+ziMGK1LUACUbmyGvlZlY7uLEIOmj3XQ13nVhqI2hL5M6AhFPk71fwUz8xAxbox5kPLRcQrnEmJngVggGPJoS5r3//XidEzlGoYBaHkE017kX8loUsI/8hqBlZju99KVXOoFLQOvJx0hDPFhiriPrwiEyAKkDQdJhdGn1nUNBTataLDWrnJiQpLvSXr4aXmSs2qorY4rApOxZLnxnii4fakM6q3bqt8iSm23Wquy6McHz7P7xuLSUyiD3OzuURLzQHFkt+S3WjtwPAnEobAbG7iskRD1wi/p+7/Bz7fCwguCGwJKvJBAWuaenhbQLJnADrc2RUbGPjG+yMBQJVo1wjYgQ3IM50S6MQW+Ek4irMSLjCTs3CTsib9OBmVipoA3C7zOQxEQJqwQAYlZd4bppltOSLidB7lAvdrG2OhYPwn65JmSBGGFpeJOfZ9wKtlodSduYRx7D4DrrKgyUGlb6DFUlKMW4BRlurnFQr+O6EaFvjgYafdTp3wt5hkGukrJMMrTTu5kbgtlfRw3+p+iZccCq+TvMtfBvPqdTJw9c8hCSHrpA7Aoz1UvC0gMvFCnvUHX8j2Tj9ZXY/HEo+lI7T+6SmbzzAXEmitSbvzQjHJw==and this in the sshfp-ed25519 file:
[svc.asifbacchus.app]:222 ssh-ed25519 AAAAC3NzaC1lZDI1NTE5AAAAICivC0q/s4QJphaXLesof7yhheC2Gmr5WPbwYgtPS61oBefore we can convert these to the correct SSHFP format, we need to clean up the output a bit. Specifically, we need to delete everything in the square brackets and the port number as well as the space after that. If you want to be fancy, you can use the following sed command, or you could just manually delete stuff in your favourite text editor.
sed -i -E 's/^[^ ]+ //' sshfp-*Either way, your results should look like this, again assuming you were querying my server. Your files will look pretty similar except the actual keys will be different. The main point is that that your files start with ssh- followed by the key type, a space and then the public key itself.
My modified sshfp-rsa file:
ssh-rsa AAAAB3NzaC1yc2EAAAADAQABAAACAQDJA3k45QIajS/iaRbOoOzeSdiGmnDC6/PVlqHnj0ut9hGFq92Qw4eN7zvQDRAfst+ziMGK1LUACUbmyGvlZlY7uLEIOmj3XQ13nVhqI2hL5M6AhFPk71fwUz8xAxbox5kPLRcQrnEmJngVggGPJoS5r3//XidEzlGoYBaHkE017kX8loUsI/8hqBlZju99KVXOoFLQOvJx0hDPFhiriPrwiEyAKkDQdJhdGn1nUNBTataLDWrnJiQpLvSXr4aXmSs2qorY4rApOxZLnxnii4fakM6q3bqt8iSm23Wquy6McHz7P7xuLSUyiD3OzuURLzQHFkt+S3WjtwPAnEobAbG7iskRD1wi/p+7/Bz7fCwguCGwJKvJBAWuaenhbQLJnADrc2RUbGPjG+yMBQJVo1wjYgQ3IM50S6MQW+Ek4irMSLjCTs3CTsib9OBmVipoA3C7zOQxEQJqwQAYlZd4bppltOSLidB7lAvdrG2OhYPwn65JmSBGGFpeJOfZ9wKtlodSduYRx7D4DrrKgyUGlb6DFUlKMW4BRlurnFQr+O6EaFvjgYafdTp3wt5hkGukrJMMrTTu5kbgtlfRw3+p+iZccCq+TvMtfBvPqdTJw9c8hCSHrpA7Aoz1UvC0gMvFCnvUHX8j2Tj9ZXY/HEo+lI7T+6SmbzzAXEmitSbvzQjHJw==and my modified sshfp-ed25519 file:
ssh-ed25519 AAAAC3NzaC1lZDI1NTE5AAAAICivC0q/s4QJphaXLesof7yhheC2Gmr5WPbwYgtPS61oNow we can use these files to generate our SSHFP entries.
# get SSHFP entries for RSA host key
ssh-keygen -r svc.asifbacchus.app -f sshfp-rsa
# will output
svc.asifbacchus.app IN SSHFP 1 1 ba1928e81f75aad19e7993679c18acd05129bff5
svc.asifbacchus.app IN SSHFP 1 2 f05a25d7416d19a112717be4b1c2a559741ef0aab6d1269edcd734a546dead9b

# get SSHFP entries for ed25519 host key
ssh-keygen -r svc.asifbacchus.app -f sshfp-ed25519
# will output
svc.asifbacchus.app IN SSHFP 4 1 e7bcd349faf7fcfc70e7235edae928ea19b2de0f
svc.asifbacchus.app IN SSHFP 4 2 3b00cc3606a6f6e39b45f7783376be07041632fa9105932c0f6a49428176d61f
Great work, you can delete those temporary output files (sshfp-rsa and sshfp-ed25519) at your leisure. Let’s take a look at the output and understand what we have. Let’s focus on the part after IN SSHFP:
For the RSA host keys, we have two entries - one with 1 1 and one with 1 2 after IN SSHFP. These are the same, but the hash algorithm is different. The first 1 means RSA and the second 1 means SHA-1 while the 2 means SHA-2. The ED25519 keys have similar output. The 4 means ED25519, the 1 means SHA-1 and the 2 means SHA-2.
Best practices dictate that we only use RSA and ED25519 keys (which is why we didn’t hash anything else) and that we always use the SHA-2 algorithm. Therefore, for my server you’ll see that my DNS entries for svc.asifbacchus.app contain two SSHFP records as follows:
svc.asifbacchus.app IN SSHFP 1 2 f05a25d7416d19a112717be4b1c2a559741ef0aab6d1269edcd734a546dead9b
svc.asifbacchus.app IN SSHFP 4 2 3b00cc3606a6f6e39b45f7783376be07041632fa9105932c0f6a49428176d61f
That’s all there is to it!
Testing SSHFP records
In order to avoid all prompts, we need to confirm that our records exist and they are signed via DNSSEC. If they are not signed, we will still get a prompt but you will be told the hash was retrieved from the SSHFP record. We can use dig to confirm our records. If dig isn’t installed, you might want to install it since it’s a good tool for any admin. On Debian, you’ll find it in the dnsutils package and can install it like this:
apt update
apt install -y dnsutils
To have a proper test, we need to require DNSSEC and use a DNS server that understands that type of lookup. If you’re not sure your DNS server supports DNSSEC lookups, just use CloudFlare’s DNS server at 1.1.1.1. Here’s the dig command you’d use:
# dig @DNSSEC-compatible-DNS-server your.server.net sshfp +dnssec +multi
dig @1.1.1.1 svc.asifbacchus.app sshfp +dnssec +multi
Here's the output
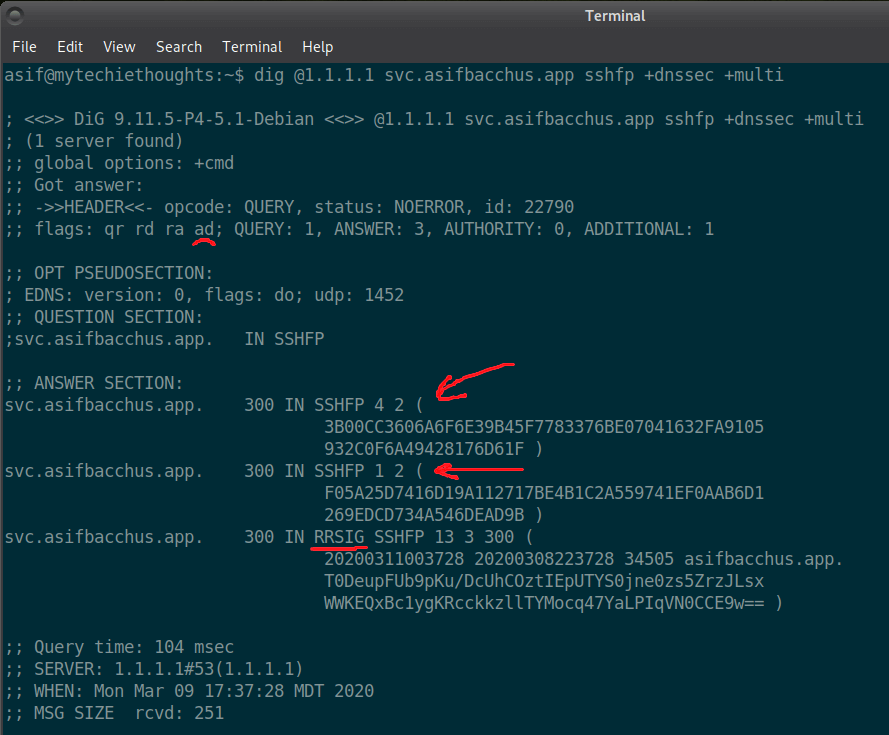 [close]
you’d get when looking up my server.
[close]
you’d get when looking up my server.
I’ve underlined the ad flag which stands for authenticated data and means that DNSSEC was validated (the do flag means no error, I forgot to underline that one, sorry). I’ve also drawn arrows to the SSHFP records and underlined the RRSIG record which is the key used to sign the records. If your results have all these elements then everything is properly setup!
Client setup
Although it has been around for a while, SSHFP has not been as widely adopted as I think it should be. It really does make verifying server identity trivial and that means man-in-the-middle attacks can be greatly mitigated. That being said, most clients do NOT support automatically looking up and verifying SSHFP records! Let’s run through a few popular ones:
OpenSSH client (Debian/Ubuntu default client)
Shockingly, the OpenSSH client does not do SSHFP lookups by default. To take advantage of all our hard work in this article, you can connect as follows to make OpenSSH do a lookup:
ssh -o VerifyHostKeyDNS=yes your.server.net
# or 'verbose' to see the lookup results
ssh -o VerifyHostKeyDNS=yes -v your.server.net
However, that’s a pain so you should probably just update your default configuration instead. Fire up your text editor and open /etc/ssh/ssh_config, then add the following line:
VerifyHostKeyDNS yesNow OpenSSH will do the DNS lookup automatically for every server you connect to and you don’t have to remember that awkward -o parameter.
Windows clients
I can’t find a Windows that supports SSHFP lookups! Neither PuTTY nor Bitvise SSH Client support SSHFP yet it’s supposedly been ‘on the wishlist’ for years now. Even the SSH client built into PowerShell still says ‘dns host key verification is not supported in Windows yet’. So, bad news for those of us that use Windows, I guess. If anyone knows a good SSH client for Windows that supports SSHFP then please let me know in the comments!
Final thoughts
SSHFP records make confirming you are connecting to the right machine much easier, in some cases automated and in general make your SSH experience cleaner. Although automated checks using Windows clients don’t seem to exist yet, taking the extra few minutes to set these records up anyways is definitely worth it. I hope this was helpful and I look forward to seeing you again in a future article!
Thanks for reading my techie-thoughts on this issue. Have any comments or suggestions? Want to add your tips? Things you want me to cover in a future article? Comment below!