Editing your registry is potential very dangerous and could lead to you screwing up your entire system, necessitating a restore from backups or even a full re-install! If you screw something up, you may not be able to start your computer normally. I strongly suggest backing up your registry before making any changes and being familiar with how to restore that backup in case you run into any problems. Only proceed if you understand what you're doing, the risks involved and if you promise not to hunt me down and hurt me if something goes wrong!
Contents
Starting with the May cumulative Windows 10/Server 2016 update, you may have run into a CredSSP error when trying to connect via Remote Desktop Protocol (RDP) to another computer.
Specifically, you get the following error:
An authentication error has occurred. The function requested is not supported. Remote computer: <computer name or IP>. This could be due to CredSSP encryption oracle remediation…
It’s not just you, it surprised a bunch of people. So what’s happening and how do we resolve this issue and get you connected again? Well, the short answer is both computers need to be updated, the long answer is that there’s a workaround…
What is this whole CredSSP?
The Credential Security Support Provider (CredSSP) protocol is basically one of the ways credentials are passed between computers during an RDP connection. There’s an identified vulnerability that allows remote code execution during this credential hand-over (see CVE-2018-0886 entry in the NVD for technical details). So, it’s important that your Windows systems, both client and server, are patched. The RDP connection problem occurs when one system is patched and the other system is not. By default, patched systems will not connect/permit connections from unpatched systems… that’s the issue.
Workaround for temporary connections
First off, let’s remember this is a WORKAROUND. You really really really need to get all your systems patched ASAP. But, you might need to connect remotely to a system in order to patch it… I hear ya…
Remote system is patched, local system is unpatched
This one is easy. PATCH YOUR SYSTEM! Once the patch is installed and your system is rebooted, you’ll be able to connect. The patch is available via your regular Windows Update.
Local system is patched, remote system is unpatched
The actual patching of the CredSSP happened in a March update, the error messages were updated in April but, in May, the Registry was changed to disallow connections between patched and unpatched systems. You can bypass this security setting via Local Group Policy or via the Registry. Pick your poison, you only have to use one method OR the other:
Local Group Policy
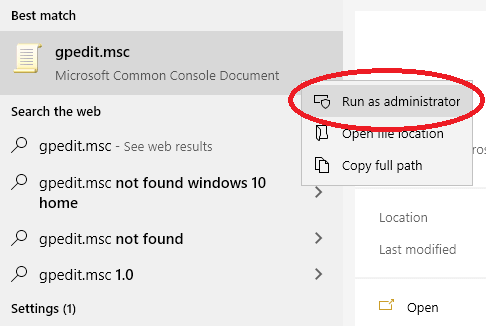
- Open the Local Group Policy Editor by going to your Start Menu and typing “gpedit.msc”, right-click on the search result and choose “Run as administrator”. (screenshot)
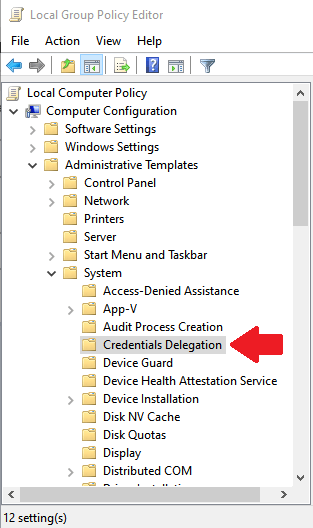
- Browse to Computer Configuration >> Administrative Templates >> System >> Credentials Delegation. (screenshot)
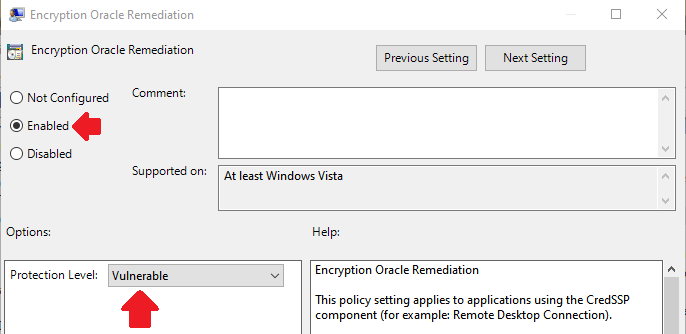
- Select Encryption Oracle Remediation policy and set it to Enabled.
- Change the Protection Level to Vulnerable. (screenshot)
Windows Registry
- Open up PowerShell as an administrator.
- Type the following to add a key to the Registry:
New-Item -Path "HKLM:\\Software\\Microsoft\\Windows\\CurrentVersion\\Policies\\System\\CredSSP" -Name "Parameters" -Force
New-ItemProperty -Path "HKLM:\\Software\\Microsoft\\Windows\\CurrentVersion\\Policies\\System\\CredSSP\\Parameters" -Name "AllowEncryptionOracle" -Type DWORD -Value 2- Giv’er a reboot and you’re in business. You should be able to connect to an unpatched system.
Resetting your system to a secure state
After you’ve connected to whatever unpatched systems you need to work with, it’s important to reset your system to refuse unsecured connections by default. In other words, we need to reverse exactly what we just did in the previous step. Here are your options again… remember, chose one method OR the other:
Local Group Policy
- Open the Local Group Policy Editor by going to your Start Menu and typing “gpedit.msc”, right-click on the search result and choose “Run as administrator”. (screenshot)
- Browse to Computer Configuration >> Administrative Templates >> System >> Credentials Delegation. (screenshot)
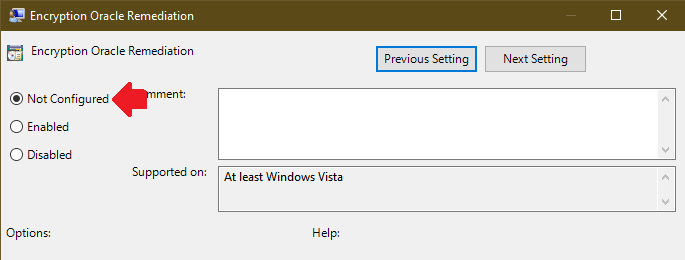
- Select Encryption Oracle Remediation policy and set it to Not Configured. (screenshot)
Windows Registry
Editing your registry is potential very dangerous and could lead to you screwing up your entire system, necessitating a restore from backups or even a full re-install! If you screw something up, you may not be able to start your computer normally. I strongly suggest backing up your registry before making any changes and being familiar with how to restore that backup in case you run into any problems. Only proceed if you understand what you're doing, the risks involved and if you promise not to hunt me down and hurt me if something goes wrong!
- Open up PowerShell as an administrator.
- Type the following to delete the key we added earlier from the Registry:
Remove-Item -Path "HKLM:\\Software\\Microsoft\\Windows\\CurrentVersion\\Policies\\System\\CredSSP" -Recurse- Reboot and you’re in business. Your system will revert to default (patched) behaviour and you’ll only connect to other patched systems.
Q&A for the curious-minded
Why is the default set to require all systems be patched before connecting?
When connecting, credentials have to be passed from one system to another. Therefore, any system that is not patched is vulnerable to having code executed during this transfer… that’s the problem. To avoid this, the systems check whether or not the other one is patched and if not, the credential transfer doesn’t even occur thereby mitigating the risk of remote code being executed.
What do the numbers in the Registry setting mean?
They correspond to the order of the Group Policy settings (actually vice-versa, but go with me here). Here’s a table to summarize:
| Property | Value |
|---|---|
| Force updated clients | 0 |
| Mitigated | 1 |
| Vulnerable | 2 |
Why am I deleting everything to re-secure my system?
It may seem that you need to set the Oracle Remediation policy to ‘Force updated clients’ (or 0 in the Registry) to undo the changes in this article… you’d be right. However, that also means Windows has to check and apply that policy. On the other hand, on a patched system, those are the default settings. So by simply deleting any contrary policies/settings, Windows will use its defaults which is faster.
Final thoughts
Well, that’s it from me on this topic. I hope this helps you get connected and update all your systems.
Thanks for reading my techie-thoughts on this issue. Have any comments or suggestions? Want to add your tips? Things you want me to cover in a future article? Comment below!